Backflow Preventer Repair: What Fails, What It Costs, and When to Replace Instead
A failed backflow test does not always mean a new device. Most assemblies can be repaired at a fraction of replacement cost — if you understand what broke, what the fix involves, and when the math stops working in repair's favor.
You scheduled your annual backflow test, the certified tester spent 30 minutes at your property, and now you have a failed test report in hand and a deadline from your water utility to fix the problem. The first question most property owners ask is a practical one: do I repair this device or replace it entirely?
The good news is that the majority of backflow preventer failures are repairable. The bad news is that not every property owner — and not every contractor — approaches this decision with full information. Some technicians reflexively recommend replacement when a rebuild is the smarter choice. Others rebuild devices that are genuinely past their useful life, charging repair fees for a fix that will not last. Knowing the difference requires understanding what actually fails inside a backflow assembly, what the repair process involves, what realistic costs look like, and what conditions genuinely tip the scales toward full replacement.
This article covers all of it — organized around the decisions you actually need to make after receiving a failed test result.
Why Backflow Preventers Fail: The Root Causes
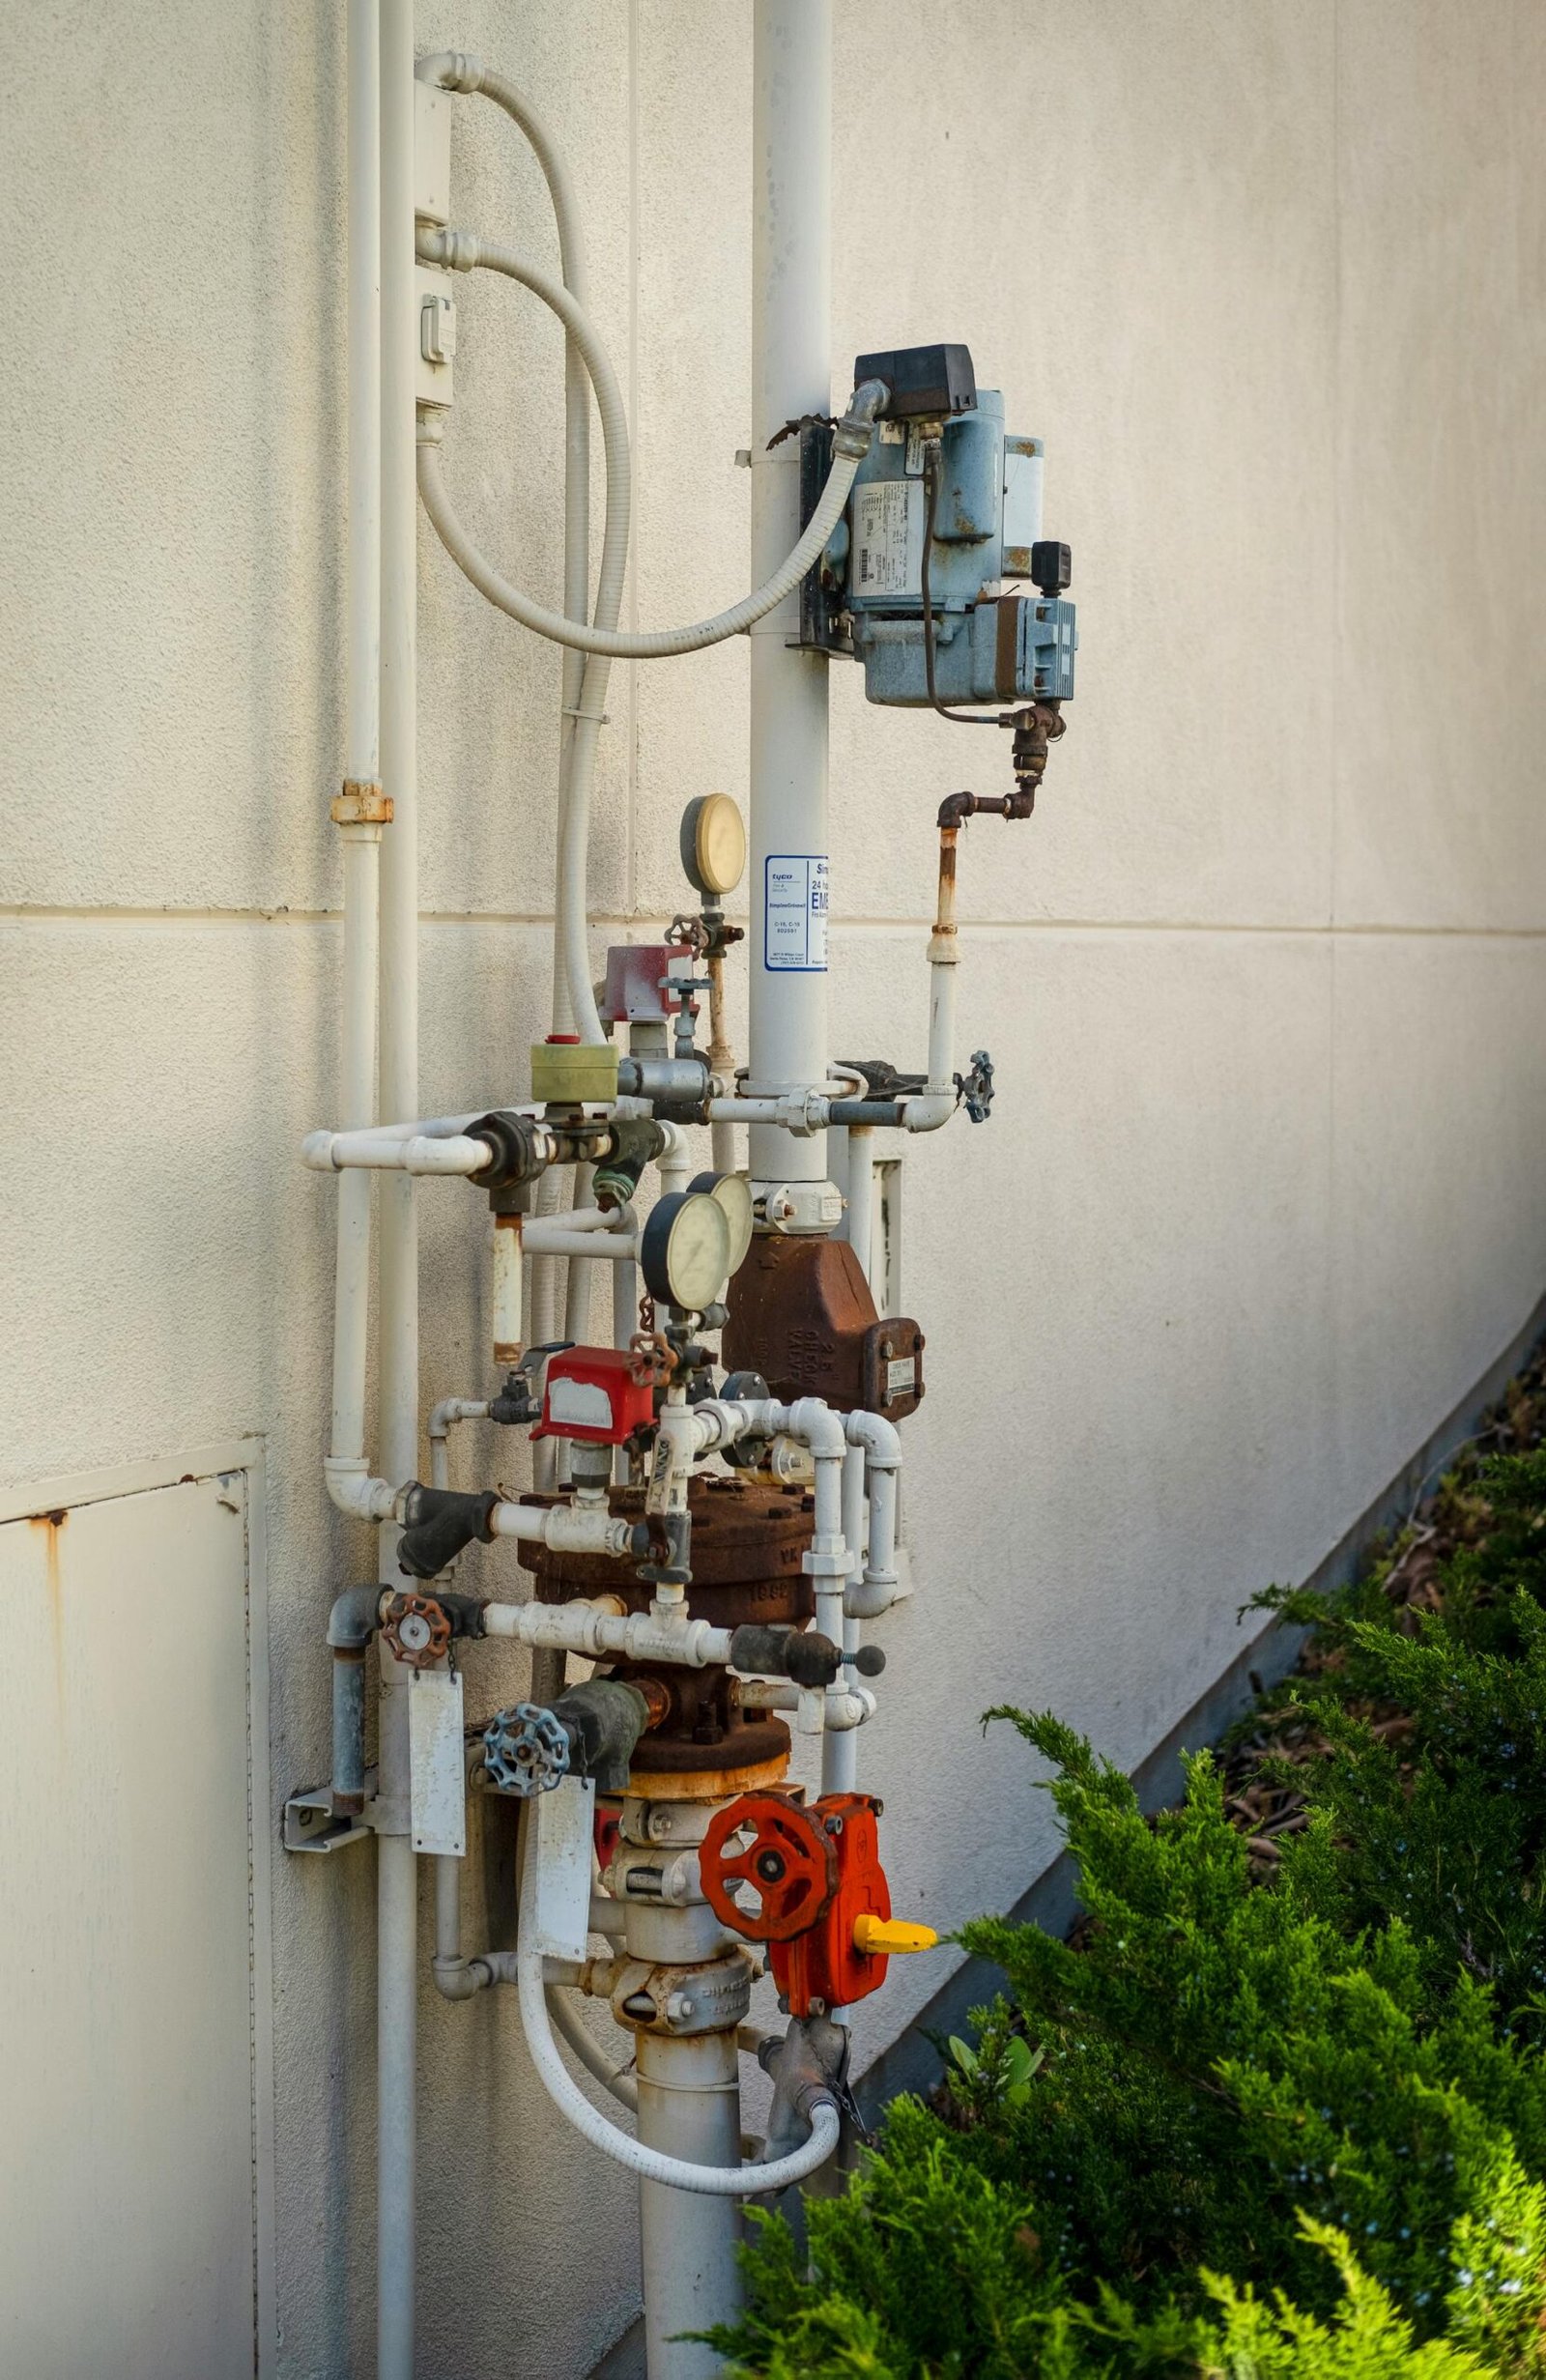
Backflow prevention assemblies are precision mechanical devices. They contain rubber seating components that must form watertight seals under varying pressure conditions, metal springs that must maintain calibrated tension across years of continuous operation, and in the case of RPZ assemblies, diaphragm-controlled relief valves that must respond accurately to pressure differentials measured in fractions of a PSI. All of these elements degrade over time, and degradation is the fundamental cause of virtually every backflow preventer failure.
Understanding the three primary degradation mechanisms — rubber aging, mineral accumulation, and metal fatigue — is the foundation of good repair decision-making.
Rubber Degradation
The rubber O-rings, seat discs, and diaphragms inside a backflow assembly are in constant contact with chlorinated municipal water. Chlorine and chloramines — the disinfectants added to virtually all public water supplies — degrade rubber elastomers over time, causing them to harden, lose flexibility, and eventually crack. A rubber seat disc that has hardened cannot conform to the metal seating surface it presses against, and a small gap is all it takes to fail a test. Rubber degradation is the most common cause of check valve failure across all assembly types, and it is also the most straightforwardly repairable: new rubber components restore the sealing function that the original parts have lost.
The rate of rubber degradation varies with water chemistry. Systems with higher chloramine concentrations, lower pH, or water temperatures above the normal range see faster rubber aging. Assemblies in hot water systems or locations with aggressive water chemistry may require rebuild attention every five to seven years rather than the ten to twelve year interval typical in moderate conditions.
Mineral Accumulation and Debris
Municipal water carries dissolved minerals — primarily calcium and magnesium carbonate — that precipitate out of solution and accumulate on surfaces inside valve bodies over time. Scale buildup on check valve seats prevents full closure. Grit and fine particulate from aging distribution infrastructure, or from disturbances caused by nearby construction or main breaks, can lodge between the rubber disc and the seating surface in a single event, causing an immediate test failure that has nothing to do with the age or condition of the assembly.
Debris-caused failures are often the easiest to repair. Disassemble the check module, clean the seat and disc, inspect for damage, and reassemble. If no damage is found, the device frequently passes its retest. The practical problem is that a technician cannot diagnose a debris failure versus a rubber failure without opening the assembly — which is why on-site repair at the time of a failed test, when the tester is already present and the device is already open, is frequently the most efficient approach.
Metal Fatigue and Corrosion
The springs inside backflow assemblies maintain the pressure differentials that check valves must hold during testing. Springs are under continuous compression for the operational life of the device, and metal fatigue eventually reduces their tension below the threshold required to hold the minimum test differential. Spring failure is gradual and predictable — a device that is barely passing its annual tests is often showing early signs of spring fatigue — and spring replacement is a standard component of a full rebuild.
More serious is corrosion of the brass valve body itself. Brass is highly corrosion-resistant under normal conditions, but exposure to certain water chemistries — soft water, water with low alkalinity, or water with elevated chloride or sulfate concentrations — can cause dezincification, a form of selective corrosion in which zinc is leached from the brass alloy, leaving behind a porous, weakened copper matrix. Dezincification is visible as a pinkish or reddish discoloration on the external brass body, particularly around machined surfaces and threaded fittings. Once dezincification has compromised the structural integrity of the valve body, no amount of internal rebuild will restore reliable function — replacement is the only correct answer.
The Five Most Common Failures — and Their Fixes
1. Fouled or Worn Check Valve Seat
The check valve seat is where the rubber disc presses against the metal housing to form a seal. Both debris lodging on this surface and rubber hardening that prevents full conformance produce the same result: a check valve that leaks under test conditions. The repair approach depends on what the technician finds when the check module is opened. Clean seat with undamaged rubber: clean and reassemble. Damaged rubber disc: replace the disc or the entire check module. Damaged or pitted seating surface: replace the check module or the entire assembly if the seat is part of the valve body.
2. Worn or Hardened Rubber O-Rings
O-rings create watertight seals at every internal joint and component interface within the assembly. Hardened O-rings that no longer compress fully allow water to bypass check valve components through the gap between module and housing rather than through the valve itself. This produces a test failure that looks identical to a check valve seat failure until the technician examines which seal is leaking. O-ring replacement is the core of any rebuild kit and is the single most common repair across all assembly types.
3. Relief Valve Failure (RPZ Assemblies)
RPZ relief valves fail in two distinct ways. The first is a relief valve that opens prematurely — at a higher differential pressure than specified — causing the RPZ to discharge continuously during normal operation. This typically indicates a failed or hardened diaphragm that is no longer responding correctly to pressure changes. The second is a relief valve that fails to open at the correct threshold during testing — indicating a diaphragm that is stuck, a fouled valve seat, or a spring that has lost tension. Both scenarios fail the test and require diaphragm replacement or a full relief valve module swap.
4. Shut-Off Valve Failure
Each backflow assembly includes shut-off valves at the inlet and outlet that must fully close during testing to isolate the device. If either shut-off valve fails to fully close — because of worn seals, a damaged ball, or corrosion — the test cannot be completed correctly, producing a recorded failure. The shut-off valve itself is a separate component from the backflow assembly body. Replacing a failed shut-off valve is generally straightforward, but it requires cutting into the supply line on one side of the assembly and is plumbing work that must be performed by a licensed contractor in most jurisdictions.
5. Catastrophic Body Damage
Freeze damage, physical impact, and advanced dezincification can crack the brass body of the assembly itself. A cracked valve body cannot be repaired — the assembly must be replaced. Freeze cracking is the most common form of body damage and typically appears as a visible split along the relief valve port area or across the internal cavity walls of the check modules. The crack may not be immediately obvious if it is hairline, but it will be revealed by water spray or significant leakage when the supply is restored.
Never Attempt DIY Backflow Repairs
Rebuilding a backflow assembly requires the same calibrated differential pressure test equipment used for annual testing — without it, there is no way to verify that the repair was effective. A repair that appears successful but leaves a device marginally below specification creates a false compliance record while leaving the water supply at risk. All repairs must be followed by a certified retest and the results filed with the water authority.
What a Rebuild Actually Involves
A backflow preventer rebuild — also called an internal rebuild or overhaul — is the process of disassembling the valve body, replacing all rubber components, springs, and any damaged modules with manufacturer-certified parts, and reassembling the device to original specification. A proper rebuild is not a patch: it addresses every internal wear component simultaneously, not just the specific element that triggered the test failure.
For most residential and light commercial assemblies in the 3/4″ to 1″ size range, a skilled certified technician can complete a full rebuild in 45 to 90 minutes on-site, working directly on the installed assembly without removing it from the supply line. For larger commercial assemblies — 1-1/2″ to 4″ RPZ devices — rebuild time runs longer, and some repairs require the assembly to be shut down for an extended period.
Manufacturer-certified rebuild kits are available for all major brands: Watts, Febco, Wilkins, Ames, Apollo, Conbraco, and others. These kits include the specific rubber compounds, spring tensions, and component dimensions that the original device was designed around. Generic or aftermarket parts may be less expensive, but many water authorities require manufacturer-certified components for repairs on devices that will be tested for public water supply compliance. Using non-certified parts can result in a failed retest or a rejected test report.
After any rebuild or repair, the device must be retested by a certified tester before a passing report can be filed. In many cases, the same technician who performed the repair also conducts the retest immediately after, completing the entire repair-and-retest cycle in a single service call — the most efficient and cost-effective approach when it is available.
The Repair vs. Replace Decision Framework
The repair-versus-replace decision is not purely financial, though cost is the most immediately visible factor. The correct framework weighs four considerations together: the age of the assembly, the nature of the failure, parts availability, and the total cost relationship between repair and replacement.
Age as the Primary Variable
Age is the single most important factor in this decision. A backflow assembly that is less than ten years old with an isolated failure is almost always a repair candidate. The valve body is structurally sound, manufacturer-certified parts are readily available, and a rebuild will realistically restore five to ten or more years of reliable service. An assembly in the twelve to fifteen year range requires a more careful evaluation — rebuild it if the body is in good condition and the failure is isolated, but factor in the possibility of another failure within the next three to five years when comparing the cost of repair to the cost of replacement.
Beyond fifteen years, replacement is often the more economically rational choice even when the specific failure is minor. The decision to rebuild a fifteen-year-old assembly is a decision to invest repair money into a device that is approaching the end of its reliable service life. New assemblies from major manufacturers come with a warranty and reset the maintenance clock. Assemblies over twenty years old with no documented rebuild history should almost always be replaced rather than repaired, regardless of what the specific failure appears to be.
Nature of the Failure
Isolated internal component failures — a fouled check valve, a hardened O-ring, a failed relief valve diaphragm — on an otherwise sound assembly are clear repair candidates. The failure is specific, the repair is targeted, and the valve body remains serviceable.
Body damage changes the calculus entirely. A cracked housing from freezing, a valve body showing active dezincification, or a device with corroded or damaged threaded connections cannot be reliably repaired. These conditions require full replacement. Similarly, an assembly that has failed multiple consecutive annual tests despite recent repairs is telling you something: either the repairs have not been addressing the underlying problem, or the assembly has reached the point where component degradation is pervasive enough that each rebuilt element is quickly followed by the failure of the next weakest component.
Irrigation and Sprinkler Systems
If your property has an in-ground irrigation system connected to the municipal water supply, you almost certainly have a backflow preventer installed — and you are almost certainly required to have it tested annually. Irrigation systems are among the most common sources of backflow incidents because they introduce fertilizers, pesticides, soil, and standing water into close proximity with the potable supply. Even residential irrigation systems with modest backflow risk are subject to annual testing requirements in most jurisdictions.
Residential homeowners with lawn irrigation systems are frequently surprised to learn they have a compliance obligation. If you received a notice from your water utility referencing your irrigation system, this is the requirement being referenced.
Single-Family Residential Properties
Testing requirements for single-family homes vary more widely than for commercial properties. In many jurisdictions, only residences with in-ground irrigation systems, private wells connected to the municipal supply, swimming pools, or other specific features are subject to mandatory testing. However, some municipalities — particularly in California, Oregon, Washington, and parts of the Northeast — have extended annual testing requirements to all single-family residential connections. Check your state and local requirements carefully.
Parts Availability
The practical constraint that sometimes forces a replacement decision regardless of age or failure type is parts availability. Manufacturers discontinue product lines, and certified rebuild kits for older assemblies eventually go out of production. When certified parts are not available, a water authority may not accept a rebuild as a compliant repair, requiring replacement with a current-production assembly. Before approving a repair on any assembly older than ten years, confirm with the technician that manufacturer-certified rebuild kits are in stock and immediately available.
The 50 Percent Rule
A widely used industry guideline suggests that when the cost of repair exceeds 50 percent of the installed cost of a new equivalent assembly, replacement is the more economical choice — particularly when the device is ten years old or older. This rule provides a useful default, but it should be applied with awareness of the age and condition factors described above. A repair that costs 40 percent of replacement on a device that is eight years old and in excellent structural condition is a sound investment. The same repair cost on a device that is fourteen years old, has been rebuilt twice before, and shows early signs of body corrosion may not be.
Cost Reference: Repair and Replacement Ranges
The following table summarizes typical cost ranges for common repair and replacement scenarios. All figures represent total installed costs including parts and labor in a standard-access installation. Difficult-access installations — underground vaults, confined mechanical rooms, or assemblies requiring temporary water system shutdown — will run higher.
| Repair Type | Parts Cost | Total Installed | Best Candidate |
|---|---|---|---|
Cleaning / debris removal |
$0–$30 |
$75–$150 |
Newer device, isolated fouling |
O-ring / seal replacement |
$20–$60 |
$100–$200 |
Any age, rubber failure only |
Single check module swap |
$60–$150 |
$150–$300 |
Under 12 years, body intact |
Full internal rebuild |
$80–$250 |
$200–$450 |
Under 15 years, no body damage |
Full assembly replacement (residential PVB/DCVA) |
$100–$350 |
$350–$750 |
15+ years, freeze damage, no parts |
Full assembly replacement (commercial RPZ) |
$350–$900 |
$800–$2,500+ |
15+ years, dezincification, chronic failures |
Note: Fire suppression backflow devices (DCDA, RPDA) in the 2″ to 6″ size range fall outside these residential and light commercial ranges. Testing for fire suppression devices alone commonly runs $150 to $450, and full replacement can run $3,000 to $15,000 or more depending on size and installation complexity.
Warning Signs Between Annual Tests
Annual testing is the formal compliance mechanism, but backflow preventers frequently show warning signs of developing problems between test cycles. Property owners who recognize these symptoms and respond promptly save money by avoiding emergency repair calls and prevent the possibility of a failing device going undetected until the next annual test.
Continuous dripping or steady flow from the relief valve discharge port on an RPZ assembly. Intermittent dripping during pressure fluctuations is normal; a steady stream is not. This almost always indicates a failing first check valve or a drop in supply pressure below the relief valve threshold.
Visible water pooling around the assembly base, particularly around test cock fittings or shut-off valve connections. External leaks of this kind typically indicate failed O-ring seals at threaded connections or corroded fittings that are no longer sealing.
Unexplained reduction in water pressure downstream of the assembly. A partially obstructed check valve or a debris-clogged strainer (if the assembly has an integral strainer) can restrict flow below normal operating conditions.
Visible rust streaks, green patina, or pinkish discoloration on the valve body. Rust indicates ferrous components or hardware that is corroding. Green patina on brass is normal and cosmetic. Pinkish or reddish discoloration of the brass body itself — not just on the surface — is a warning sign of dezincification.
Physical damage to the assembly body, fittings, or attached piping from lawn equipment, vehicle impact, or freeze-thaw cycles. Even minor physical damage should be assessed by a certified technician.
Any of these symptoms warrants a service call outside the annual testing cycle. The cost of an interim inspection is a small fraction of the cost of an emergency repair or a water authority fine for non-compliance resulting from an undetected failure.
Questions to Ask Your Technician Before Approving Work
When a certified technician recommends repair or replacement following a failed test, the following questions will help you evaluate the recommendation and make a well-informed decision:
What specifically failed, and can you show me? A credible technician will have the failed component in hand or will be able to point to the specific reading that caused the failure. Vague answers about the device being “old” or “not looking good” without specific component diagnosis are a yellow flag.
Is a rebuild possible with manufacturer-certified parts? If parts are available and the body is sound, a rebuild quote should always be on the table before replacement is discussed.
How old is this assembly, and have you been able to see its repair history? Some assemblies have date codes stamped on the body. Test reports filed with your water utility may also provide a history of prior repairs.
What is the total cost of the repair including retest and report filing? Many quotes cover parts and labor for the repair itself but do not include the retest fee and filing charge. Confirm the complete cost of returning to compliance.
If you recommend replacement, what device type and size are you recommending, and does it match the current code requirement for my application? This is particularly important if local requirements have changed since the original device was installed.
Warning Signs That Your Backflow Preventer May Need Attention
Annual testing catches most device failures before they cause problems, but certain symptoms between testing cycles may indicate a failing device that warrants prompt inspection:
Visible leaking or dripping from the device body, particularly from the relief valve discharge port on an RPZ (a small amount of intermittent dripping is normal; a continuous stream is not)
Sudden unexplained drop in water pressure
Discolored, cloudy, or malodorous water
Rusty or corroded valve bodies or fittings
Water meter running in reverse
Evidence of physical damage from lawn equipment, freezing temperatures, or vehicle contact
Any of these signs warrants a call to a certified backflow tester for an inspection outside of the normal annual testing cycle. Addressing a developing problem proactively is significantly less expensive and disruptive than dealing with a contamination event or an emergency repair.
Documentation Matters
Keep copies of every test report, repair invoice, and parts receipt for your backflow assembly. This documentation protects you in any dispute with your water authority, provides the repair history that informs future repair-versus-replace decisions, and is required if you sell the property and the buyer’s due diligence includes water system compliance review.
How to Find a Certified Backflow Tester Near You
Locating a qualified, certified backflow tester is not always straightforward. The best sources for finding approved testers in your area are:
Your local water utility. Most utilities maintain a published list of certified testers approved to submit test reports within their service area. This list is typically available on the utility’s website or by calling their customer service line. Starting here ensures that the tester you hire is recognized by the authority that will be receiving the test report.
State plumbing licensing boards. Many states maintain searchable databases of licensed contractors, which may allow you to filter by backflow certification.
The ASSE International website, which maintains a directory of certified professionals by certification type and location.
The American Backflow Prevention Association (ABPA), which publishes regional member directories.
When evaluating a tester, ask for their certification number and the certifying body, confirm they are approved by your local water authority, and get a clear explanation of what the quoted price includes — specifically whether filing fees and test report submission are covered.
Find a Certified Tester Near You
Use the tester directory at getyourbackflowtested.com to locate certified backflow professionals in your area. All listed testers are verified as certified by their state or local water authority.
After the Repair: The Retest and Filing Process
No repair is complete until the device has been retested by a certified tester and a passing test report has been filed with the water authority. This is not optional — it is the mechanism by which your compliance record is updated and your utility knows the problem has been resolved.
In most jurisdictions, the water authority sets a deadline for repair completion and retest filing after a failed test — typically 15 to 30 days. This window applies from the date of the failed test, not from when the repair was completed. A repair completed on day 28 of a 30-day window leaves two days to get the retest conducted and the report filed, which is cutting it very fine. Schedule the repair as early as possible within the deadline window, not at the last moment.
If the repair was performed and the device was retested in the same service call — which is common and efficient — confirm with your technician that they submitted the passing retest report to the water authority and that you will receive a copy for your records. A passing report that is completed but not filed resolves the device problem but does not resolve the compliance problem.
See also
Part of the Backflow Testing Complete Guide series | Find a certified tester at getyourbackflowtested.com